ARM Templates are great. They allow us to provision complex solutions in a repeatable and clearly understood manner. The parameters model enables flexible templates that can adapt to a variety of inputs, however the management of these parameter files can be cumbersome.
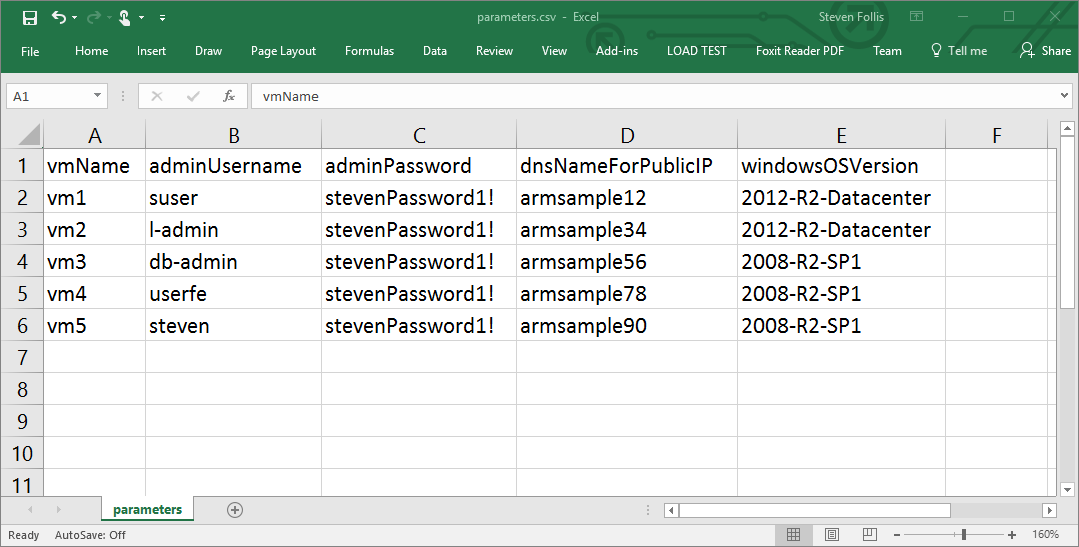
During the planning phase of a project, Excel is often used to chart out the required virtual machines for a given solution. Let’s take the following values, and create a solution in Azure using Azure Resource Manager deployments.
Create a console application
I generated a small console application written in NodeJS that will wire up several steps. I’m using ECMA6 Promises Syntax to more easily control workflow, and avoid a world of callback mess.
ECMA6 Promises need Node v4 or greater. Use
node -vto ensure you are up to date, else visit http://nodejs.org and grab an updated version
Scaffold out the console application with defining dependencies and setting up the Promise flow:
var fs = require('fs');
var path = require('path');
var msRestAzure = require('ms-rest-azure');
var resourceManagement = require("azure-arm-resource");
var Converter = require("csvtojson").Converter;
var converter = new Converter({});
var config = require('./config/config');
var _ = require('lodash');

console.log(`Starting deployment`);

// Login to Azure
login()
    .then(function (client) {

        // Execute in parallel all deployent preparation tasks
        Promise
            .resolve(client)
            .then(createRG)
            .then(deploySharedTemplate)
            .then(getParameters)
            .then(function (parameters) {
                return ([client, parameters]);
            })
            .then(deployTemplate)
            .then(function (values) {

                console.log(`Deployed ARM Template to Azure`);

            });

    });
Find all source code for this console application on GitHub
Authenticate with a Service Principal
An Azure Service Principal is an application within Azure Active Directory that can be given specific permissions within an Azure Subscription. In our scenario, we can give a Service Principal a Contributor role within our Azure Subscription, allowing the SP to create Resource Groups and Resources on our behalf.
// =========================================================
// Step 1: Login to Azure with a Service Principal
// https://azure.microsoft.com/en-us/documentation/articles/resource-group-authenticate-service-principal-cli/
// =========================================================
function login() {

    return new Promise((resolve, reject) => {

        msRestAzure.loginWithServicePrincipalSecret(config.auth.APPLICATION_ID, config.auth.APPLICATION_SECRET, config.auth.DOMAIN, (error, credentials) => {

            if (error) reject(error);

            console.log(`Authenticated with Azure via Service Principal`);

            // Create an ARM client
            var client = new resourceManagement.ResourceManagementClient(credentials, config.auth.AZURE_SUBSCRIPTION_ID);

            // Resolve client
            resolve(client);

        });

    });

}
Service Principals can be created via the Azure Portal, PowerShell, or the Azure XPlat CLI
Create a Resource Group
Our configuration file sets the name and region of a Resource Group that will hold all of our resources. We also add a tag to the RG for further management capabilities in the future.
// =========================================================
// Step 2: Create an Azure Resource Group
// =========================================================
function createRG(client) {

    return new Promise((resolve, reject) => {

        // Use the RM client to create a resource group
        client
            .resourceGroups
            .createOrUpdate(config.group.name, config.group.properties, function (error, response) {

                if (error) reject(error);

                console.log(`Created Resource Group named ${response.name}`);

                // Resolve Promise
                resolve([client, response.name]);

            });

    });

}
Deploy Shared Resources.
The CSV file lists 5 virtual machines, but there are separate resources that will be used across all of our virtual machines. Right now this consists of a Virtual Network that each VM will use. These shared resources are defined in a dedicated ARM Template, and will generate an output value to be used in future steps.
// =========================================================
// Step 3: Deploy Shared Resources ARM Template
// =========================================================
function deploySharedTemplate(values) {

    var client = values[0];
    var rgName = values[1];
    var deploymentName = `SharedResources-${_.random(100, 999)}`;

    // Read template from disk
    var template = JSON.parse(fs.readFileSync(config.template.sharedResourcesPath, 'utf8'));

    var deploymentParameters = {
        "properties": {
            "parameters": {},
            "template": template,
            "mode": "Incremental"
        }
    };

    return new Promise((resolve, reject) => {

        // Deploy template
        client
            .deployments
            .createOrUpdate(rgName, deploymentName, deploymentParameters, function (error, result) {

                if (error) reject(error);

                console.log(`Deployed Shared Resources ARM Template`);

                // Remove the Type attribute for the RG outputs
                var scrubbedOutputs = _.mapValues(result.properties.outputs, function (output) {

                    return { value: output.value };

                });

                resolve(scrubbedOutputs);

            });

    });

}
Setup Parameters
Each row of the CSV will become a set of parameters used for a deployment. Since Azure works primarily out of JSON objects, we need to serialize the local CSV file into an array of JSON objects. Then we will extend those parameters by adding the output value from the Shared Resources deployment so that each VM knows which virtual network to use.
// =========================================================
// Step 4: Parse CSV File containing ARM Template parameters and merge with Shared RG's outputs
// =========================================================
function getParameters(sharedOutputs) {

    return new Promise((resolve, reject) => {

        converter.fromFile(config.parameters.filePath, function (error, rows) {

            if (error) reject(error);

            // CSV values are returned as s tring (ex. {name: jane} )
            // ARM parameters have a format of parameter name, then a value object
            // ex. {name: jane} needs to be processed to {name: {value:jane}}
            // Loop through the original rows and process a new array

            // Create new array to hold processed parameters
            var processedParameters = [];

            // Loop through the original values
            rows.forEach((row, i) => {

                // Adjust value from a string to an object
                var processed = _.mapValues(row, function (original) {

                    return { value: original };

                });

                // Add parameters from Shared Resources deployment
                _.assignIn(processed, sharedOutputs);

                // Push new object into the array
                processedParameters.push(processed);

            });

            console.log(`Parsed parameters CSV file`);
            resolve(processedParameters);

        });

    });

}
Generate VM Deployments
We have an array of JSON objects corresponding to a desired VM. We will loop through each of these objects, combining them with a Virtual Machine ARM Template to create a series of deployments to the Resource Group.
// =========================================================
// Step 5: Deploy specific ARM Template
// =========================================================
function deployTemplate(values) {

    return new Promise((resolve, reject) => {

        // Set variables from the values array
        var client = values[0];
        var parameters = values[1];
        var rgName = config.group.name;
        var counter = 0;

        // Read template from disk
        var template = JSON.parse(fs.readFileSync(config.template.filePath, 'utf8'));

        // Loop through the sets of parameters
        // creating a new deployment for each set in the parameters array
        parameters.forEach(function (parameter, i) {

            // Define a unique deployment name
            var deploymentName = `${config.group.name}-${_.random(100, 999)}`;

            // Define object for template deployment
            var deploymentParameters = {
                "properties": {
                    "parameters": parameter,
                    "template": template,
                    "mode": "Incremental"
                }
            };

            // Deploy template
            client
                .deployments
                .createOrUpdate(rgName, deploymentName, deploymentParameters, function (error, result) {

                    if (error) reject(error);

                    console.log(`Deployed ARM Template`);

                });

            // Iterate the counter
            counter++;
            if (counter === parameters.length) resolve();

        });

    });

}
Run the console application
Navigate in the terminal to your working folder, and execute node app.js to start up the CSVProvisioner.
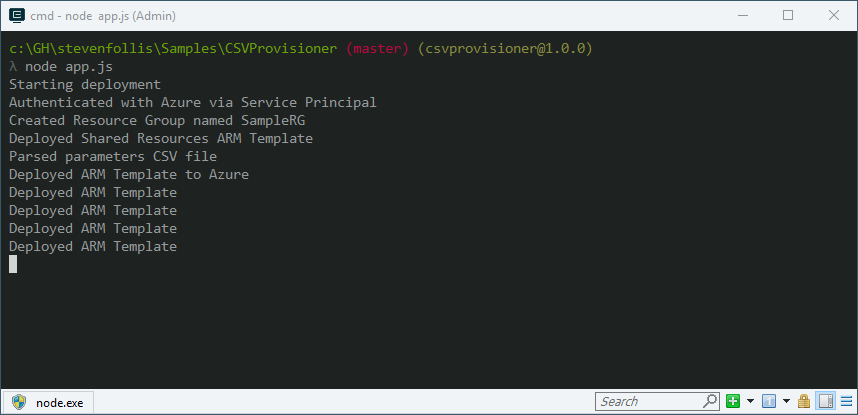
Using cmder but works across any shell
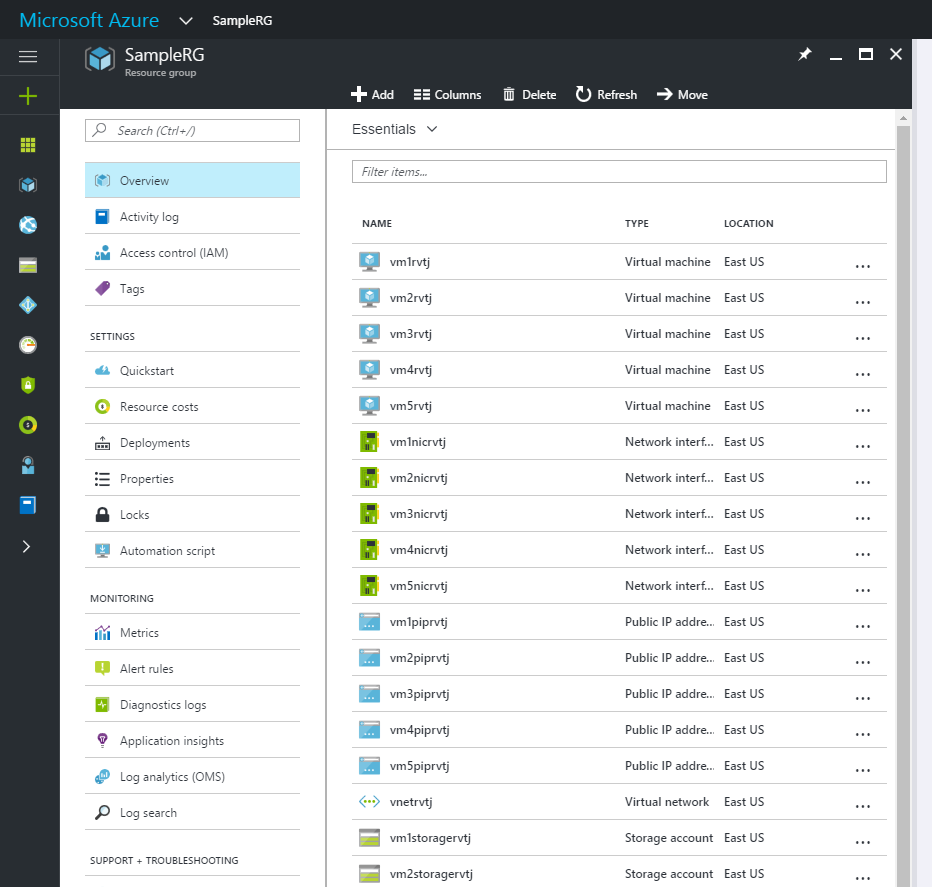
After a few minutes you should have a shiny new Resource Group full of resources that were defined in your CSV file (along with a shared VNet).
Wind Down
“Hello World” samples for Azure Resource Manager often use a simple template and a PowerShell command, but you can integrate ARM into your process in a variety of ways. For those that rely on spreadsheets to plan and organize infrastructure deployments, this sample demonstrates how deploy a series of Virtual Machines defined in a CSV file into an Azure Resource Group.
Find all source code for this console application on GitHub